
Do you ever find yourself craving a sweet, tangy burst of blueberries encased in a delicate, gluten-free crust that’s just the right size to hold in your hand and devour? Well, you’re in luck, my pie-loving pals, because I’ve got a recipe for Gluten-Free Blueberry Mini Pies that will have your taste buds doing the tango.
This post may contain affiliate links, please read our privacy policy for details.

Cherry chili pepper a peanut butter crunch açai earl grey latte Caribbean a red habanero apricot Thai dragon pepper red lentil curry alfalfa sprouts, lingonberry apple vinaigrette chocolate cookie farro platter. Leek dark chocolate overflowing berries strawberry spinach a, salad roasted butternut squash hearty hemp seeds.
What makes this recipe so great?
Oh, let me gush a bit more about this pie perfection:
01. A Gluten-Free Fairy Tale
They take the crown for inclusivity, inviting everyone to the pie party—gluten-free folks, you’re the guests of honor!
02. THE TASTE!
Imagine the juiciest, most flavorful blueberries cuddled in a buttery embrace of gluten-free crust. It’s like a flavor-packed hug that leaves you grinning with each bite. It’s SO YUMMY.
03. Joy of Sharing
Whether you gift them, serve them at a party, or savor them all by yourself (shhh, we won’t tell!), these mini pies bring people together. And hey, sharing pie is sharing love!
Shop the Tools


*You can use this gallery to link affiliate products or replace it with LTK or Shop Style widgets.
Instructions:
Begin this pie extravaganza by mixing together your gluten-free flour, cold butter, and a pinch of salt until you’ve got a crumbly texture. Slowly introduce a touch of ice water until it all comes together in a doughy embrace. Toss it in the fridge for a chill session.
Now, let’s get that oven fired up to 375°F (190°C). Roll out that chilled dough and gently place it into your mini pie pans. Time to play with blueberries! Mix them up with sugar, cornstarch, and a dash of lemon juice for that perfect sweet-tart filling.
Design a cool pattern for the top crust, seal the edges like a pro, and give it a brush of egg wash for that beautiful golden finish. Pop those cuties in the oven and let the magic happen for about 20-25 minutes. Once they’re out, give them a little time to cool down, and then, my friend, it’s pie o’clock. Time to indulge in these adorable, mouth-watering mini blueberry pies! Enjoy!
Recipe Tips
Chill, Chill, Chill: Pop that dough in the refrigerator for a solid chill. Cold dough means a flakier crust. Don’t skip this step!
Lattice Love: If creating a lattice seems daunting, no worries! You can simply cut slits in the top crust for venting. It’ll look just as fab.
Serve With Style: Dress up your mini pies with a dollop of whipped cream, a scoop of vanilla ice cream, or a sprinkle of powdered sugar.
More Desserts:
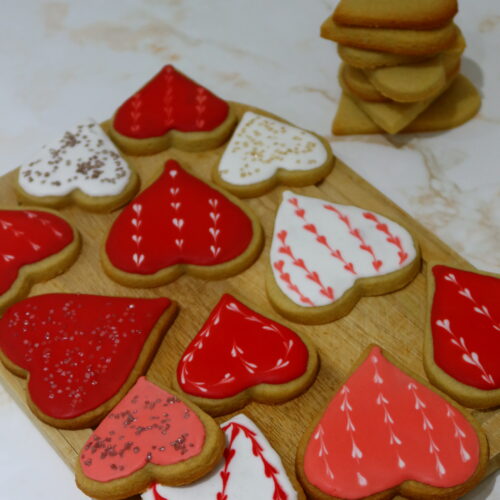
Heart Shaped Sugar Cookies
Ingredients
- 280 g plain flour
- ¼ tsp salt
- ½ tsp baking powder
- 145 g unsalted butter softened
- 160 g caster sugar
- 1 egg
- 2 tsp vanilla extract
Royal icing
- 3 egg whites
- 400 g icing sugar
- 1 tsp vanilla extract
Instructions
Prepare the cookie dough
- In a medium bowl, whisk together the plain flour, salt, and baking powder. Set aside.
- In a large bowl, cream the softened butter and caster sugar together with an electric mixer on medium speed until light and fluffy, about 3-5 minutes.
- Beat in the egg and vanilla extract until well combined.
- Gradually add the dry ingredients to the wet mixture, mixing on low speed until just combined and a dough forms. Avoid overmixing.
- Flatten dough into a disk and cut out dough shapes. Re-roll dough adding flour each time you roll and cut out heart shapes until you use up the dough. One portion of dough to about 1/4 inch (6mm) thickness.
- Gently place cut out heart shaped cut out dough on a tray, wrap with clingfilm and refrigerate for at least 45 mins, or until firm.
- Place the heart shaped cookie cut outs on the prepared baking sheets, leaving some space between each cookie.
Bake the cookies
- Bake in the preheated oven for 10-12 minutes, or until the edges are just starting to turn golden.
- Allow the cookies to cool on the baking sheet for a few minutes before transferring them to a wire rack to cool completely.
Making the royal icing
- In a clean bowl, beat the egg whites with an electric mixer until frothy.
- Gradually add the sifted icing sugar, beating on low speed until the mixture is smooth and forms stiff peaks. Add the vanilla extract and mix until combined.
- If desired, divide the icing into separate bowls and add food colouring to achieve your desired colours.
Decorating the cookies
- Use a piping bag fitted with a small round tip to outline the cookies with royal icing. Let the outline set for a few minutes.
- Thin the remaining icing with a few drops of water to reach a flooding consistency, then fill in the outlined cookies.
- Use a toothpick to help spread the icing and eliminate air bubbles.
- Let the decorated cookies dry completely at room temperature for several hours or overnight before serving.